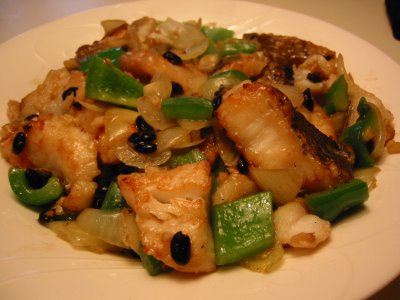
 Here's one of my favourite dishes. Whenever I spied some fresh fish fillets (especially if it's on sale) I almost always end up cooking this. The saltiness of the tausi (black beans) contrast well with the crunch and slight tartness of the green bell pepper leaving you with a good finish in the mouth. This is especially good with plain hot steamed rice.
This is adapted from the Chinese Cooking for Beginners by Huang Su-Huei. I used a non-stick pan to pan-fry the fillets because I have had bad memories of having shredded fish due to it sticking to the wok. :( Also do not overcook the fish (fry only for about 3 minutes tops) because if you do, by the time you put it in the wok for the final stir it will disintegrate before your every eyes.
Stir-fried Fish with Black Beans
500 g fish fillet
oil for pan-frying
2 Tbsp oil for stir frying
1 cup roughly chopped onions
1 Tbsp minced garlic
2 Tbsp finely chopped ginger
2 Tbsp tausi (dry fermented black beans)
1 cup roughly chopped green bell pepper
1 tsp rice wine
1/2 cup water
2 tsp cornstarch
1 tsp sugar
1/2 tsp sea salt
*Marinade:
1 Tbsp rice wine
1 tsp sea salt
2 Tbsp cornstarch
- Combine the water, 2 tsp cornstarch, sugar, and sea salt in a bowl. Stir until sugar and salt are dissolved. Set aside.
- Put marinade in a bowl, mix until salt is dissolved. Set aside.
- Score fish fillets lightly in criss cross fashion then cut them into bite-sized pieces. Mix in with marinade and let stand for 20 minutes.
- Heat wok or non-stick pan with oil for frying. Fry fillets until it changes colour (about 3 minutes), turning it half-way through. Remove from pan and drain on paper towels. Set aside.
- If you used a wok in frying the fillets, remove all the oil and wipe it clean.
- Put the 2 Tbsp oil in the wok and heat until smoking.
- Stir fry onions for a few seconds.
- Add garlic, ginger and tausi (fermented black beans); stir-fry until aromatic (it takes a few seconds only).
- Add the green bell pepper and stir-fry for a few seconds.
- Stir in the fish and wine; stir-fry for a few seconds.
- Add the water mixture, bring to boil and toss lightly. Dish up and serve hot.

As a backgrounder, Filipinos do not traditionally celebrate the evening of 31st October which is Halloween - that came with the onslaught of the American TV/Hollywood influence only in the latter years. What get us all so busy in preparing for a 'celebration' (if you can call it that) is the paying of respects to our dead family members on the 1st day of November. Everyone treks to the family plots in cemeteries up and down the country, light up candles and offer prayers. But you know us Pinoys, no matter what the occasion we never forget to stuff ourselves silly and generally have a party. So even though it should be a solemn event, people take a lot of food and stereo hi-fis in the cemetery and have a picnic. For more info on this click here and here.
In our family, the few days before Undras is a flurry of activities for everyone. Besides the cleaning of the house and yard, cleaning and repainting of the nitcho (tomb) of our dear departed relatives, my maternal side's family in Cavite always make Suman Sa Lihiya every year without fail. Since I practically grew up there, from a very early age I was sat down on a bangko (stool) and helped in this activity that involved the whole family. Invariably, it was my late Lolo Apeng (maternal grandfather) who orchestrated everything. He was a stickler for details and a perfectionist. Usually, he's the one who's at the end of the assembly line - tying together the suman at the same time acting as a QA - scrutinizing everything in our handiwork. And woe is to anyone who did not measure up, for sure he/she will get a yelling right there and then.
Suman, (in case you don't know) is a Filipino snack usually made of sticky rice or some other root crops such as cassava and tightly wrapped in leaves (usually banana). In fact, the word suman can also mean something or someone encased in something very tight. 'Para kang suman sa suot mo.' 'You look like a suman with what you're wearing.' Meaning the clothes are very tight. ;)
I surely miss those times in Cavite during Undras, besides the food, I miss the trek me and my cousins make to the cemetery to visit our great grandparents' tombs. Unlike other families, we were not allowed to bring along any food though that did not prevent us from having streetfood galore from the numerous vendors around. Nor were we allowed any radio/stereo sets so all we have to pre-occupy ourselves were the candles and we had great time trying to outdo one another in collecting the dripping wax and forming the biggest candlewax ball of all (which my aunts later make into floorwax). Only downside of this was regularly losing almost all of my fringe (bangs) from those pesky candles. ;)
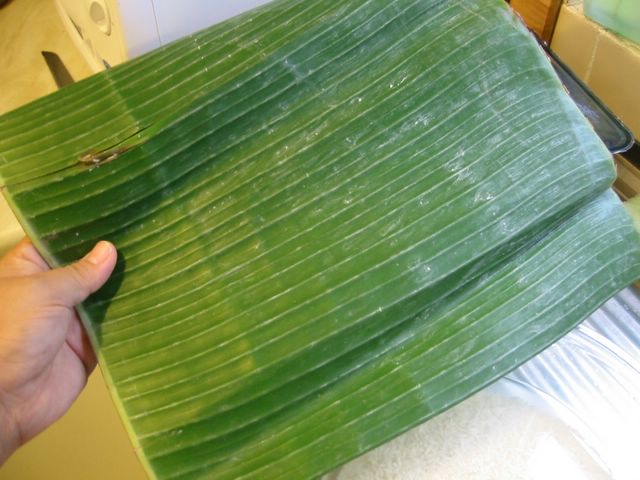
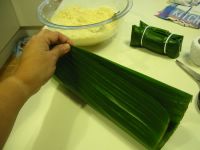
Since I was only little then, I only get to do the darang sa apoy (singeing/scorching) of the banana leaves and its preparations. That was my territory I was the banana leaf queen. My grandmother said that the best banana leaf for making suman is from the butuhan variety. They are thicker, less brittle and more flexible thus less likely to fall apart although I can't say much with its fruit whose name is so appropriate.
To be honest, this is actually the first time I've done this suman from start to finish. Although I watched my relatives so many times doing this, I have yet to actually wrap and tie one until today. As I was struggling to put my gingerly tied sumans in the pot, I suddenly realised the reason for my Lolo Apeng's suman boiler's shape. For decades I wondered how come the big 'pot' (I think he had it made to order) he used was shaped like a big suitcase. It was rectangular and even had a nice fitting lid. Well of course the suman when tied and assembled is rectangular in shape - rather like a brick. So his pot, shaped as it is, perfectly maximizes space in cooking the suman. How ingenious!

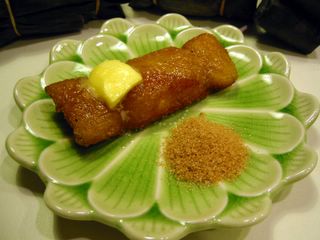
For this dish (snack?), I presented it with the different dips we use in eating it. Since the Suman sa Lihiya is very bland with just a hint taste of lye water and the banana leaves, you have to have at least some sugar to dip it in. For me the best is still the grated coconut with brown sugar. We also use latik and in my eagerness to perfectly capture a picture, I promptly burned the latik (yikes!) though it's still edible (in a dark bitter way). When we get sick and tired of eating it as it is, we pan-fry it for breakfast, slather on some butter and dip in the same suspects. Though in the mornings we're too lazy to get anything else so it would usually be just sugar.
Speaking of pictures, I got a bit trigger happy so apologies if you get bored with too many images of banana leaves and sumans.
I know most of you know this but this one is for my kids - below are pictures showing how the topside and underside of the banana leaf looks like:
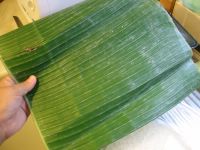
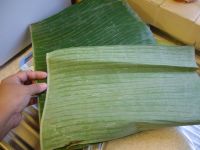 banana leaf topside                           banana leaf underside

After this when it has cooled down, wipe down both sides of the leaf with a clean cloth. Cut off the central ribs of the leaves.
Suman Sa Lihiya
1 kg malagkit na bigas (glutinous rice)
2 tsp lihiya (lye water)
prepared banana leaves
thin cotton strings
*Condiments:
grated coconut
brown sugar
Latik
- Cut or separate banana leaves into two sizes (all approximates) - one 9 x 11-inch size and the other 5 x 5-inches.
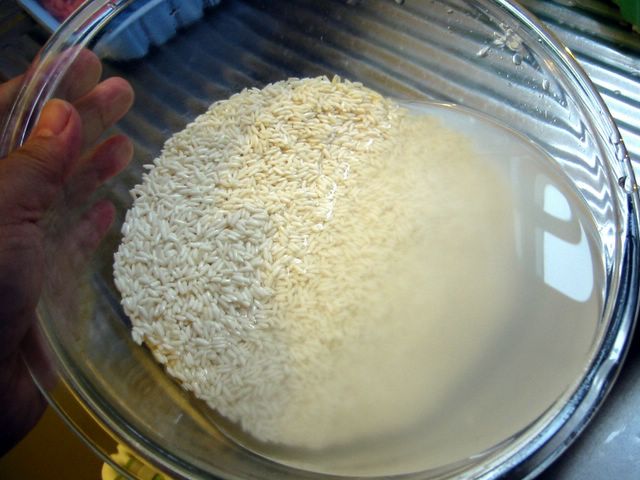
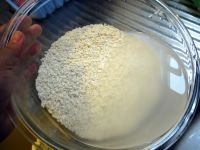 Soak the glutinous rice in water for about 1-2 hours.
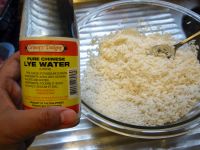 Drain and mix in the lye water. It should turn yellowish (this would depend on the strength of the lye water), if not add more lye water a little at a time until it turns yellowish. Mix well.
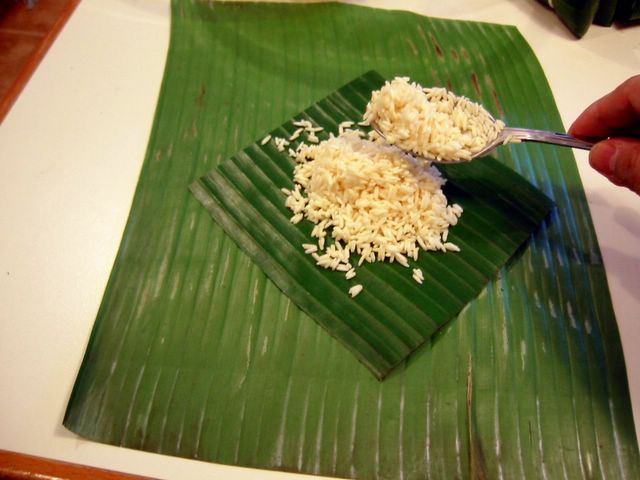
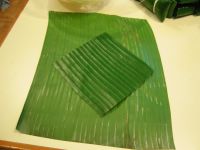 Put the big sized leaf lengthwise on a working surface - topside down. Then put the smaller one on top of it - topside up and aligned either same as the bigger piece OR positioned with the one of the corners pointing to the narrow side of the bigger piece.
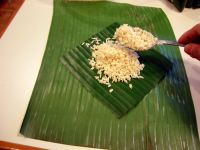 Place about 3 tablespoonfuls of the glutinous rice mixture on the smaller piece of leaf.
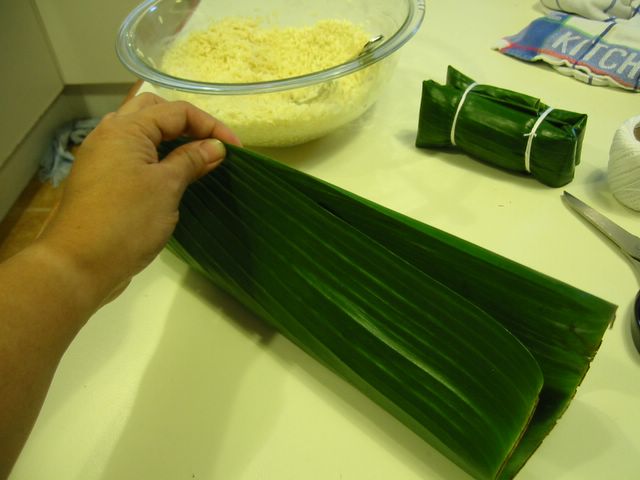
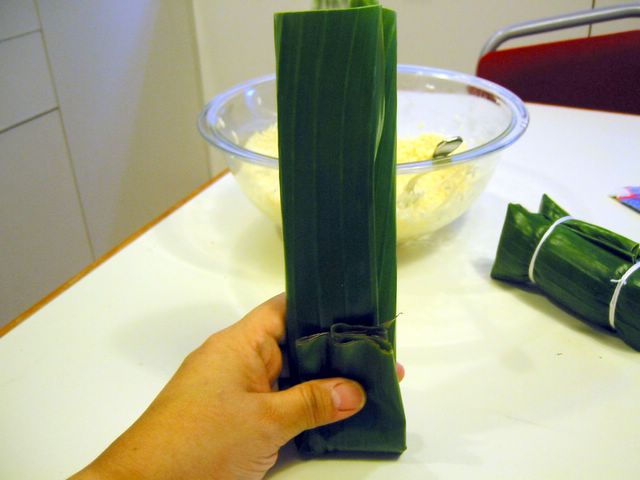
 Grab the 2 long sides of the bigger piece and bring them together. Fold or roll that side to enclose the rice (about 3 half-inch folds). It is now long and narrow shaped.
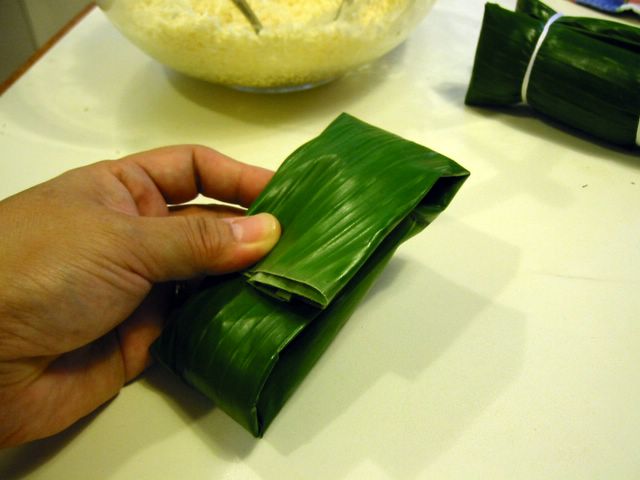
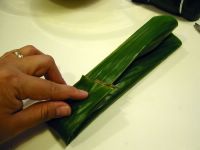 Fold about the lower 1/4 of the parcel towards the center.
 While firmly holding the folded end of the parcel, put it upright and tap it on the table to pack in the rice and if need be add more rice through the open end.
 Fold the top end towards the center. You should have a parcel about 5 x 2-inches in size.
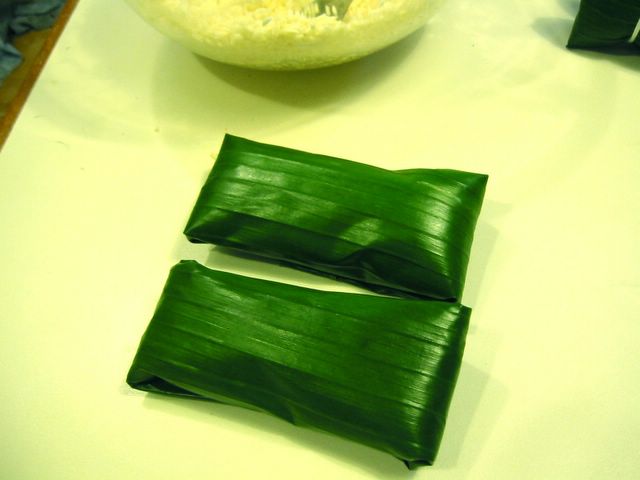
 Make another suman parcel of roughly the same size.
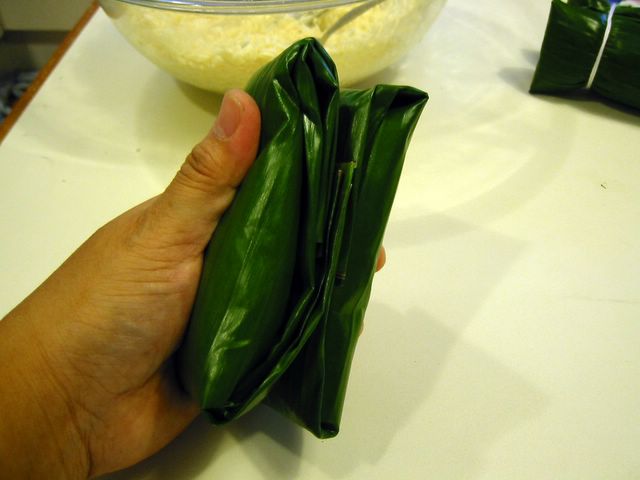
 Pair these two parcels with the folded sides facing together.
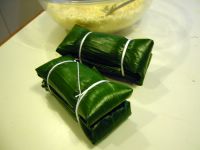 Using thin cotton strings, tie the two ends together tightly.
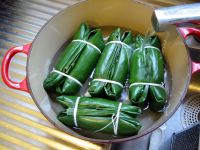 Place the assembled pieces in a big pot and add enough water to cover the suman.
- Bring to boil and bring down heat to low and simmer for about 1 1/2 hours.
- Serve warm or cold with grated coconut and sugar.

* For the Latik:
- Add 2 Tbsp sugar and pinch of salt to a 400 ml can of coconut milk in a wok or pan (preferably non-stick). Stir until sugar and salt is dissolved.
- Bring to boil then lower heat and simmer until it renders oil and sediments (the latik) start to stick to the bottom.
- At this point watch it very closely and stir it frequently (it burns easily) and fry the sediments until golden brown.
- Remove from oil with slotted spoon. Serve with the suman.
Sometimes when we get tired of eating it the usual way, we pan-fry it for breakfast and have it with butter and then dipped it in grated coconut with sugar or just plain sugar.
Lasang Pinoy 4
A current important find by the Derbyshire Record Office is a cookbook dating from 1742. The date makes it one of the oldest known comprehensive cookbook in Britain. It was previously thought that Mrs. Beeton's Book of Household Management from the mid 1800s was the oldest. This one beat it by a hundred years. Though the recipes in the former is confounding historians for the obscureness of its recipes and ingredients. For the full article head to BBC News.
P.S. There is an interesting discussion on the veracity of the above article in the comments section of this post. Please click and read on what Vanessa has to say.
 Not to be confused with my earlier recipe of Almondigas, this is one of your regular tapas bar staple. Albondigas means meatballs lightly fried in oil then simmered in tomato sauce, wine, and spices. I made this specifically for the wine tasting meet I had with several charming London food bloggers which the lovely Jeanne and Nick generously hosted in their East London house. Stupidly, I forgot to bring my camera so you'll just have to head over to the other participant's blogs for the pictures. Gosh, I missed taking pictures of all the wonderful food and wine we had.
As for this, the original recipe (adapted from Easy Tapas by Julz Beresford) called for lots of ground cloves which I discovered I wasn't particularly fond of. So I adjusted it to have that as optional afterall the sauce was marvellous what with that wine, paprika and lots of garlic and onions infused in the tomato sauce. This is usually serve warm in tapas bars and it reheats very well. Distribute around forks or toothpicks for a little pica-pica and have a red Rioja with it. Fab!
Albondigas
(Meat Balls in Tomato Sauce)
150 g minced veal or beef
150 g minced pork
1/2 small onion - finely chopped
2 garlic cloves - finely minced
1 tsp lemon juice
2 Tbsp chopped flat leaf parsley
1/2 tsp ground nutmeg
pinch of ground cloves (optional)
30 g dried breadcrumbs
1 egg - beaten
1 Tbsp single cream (light cream)
1/2 tsp ground sea salt
freshly ground pepper
plain flour for dusting (optional)
2 Tbsp olive oil
*Sauce:
1 x 400 g can chopped tomatoes
1/2 cup white wine
2 garlic cloves - finely minced
1/2 small onion - finely chopped
1/2 tsp smoked sweet Spanish paprika
1 bay leaf
ground sea salt
- Combine the breadcrumbs, cream, and beaten egg in a bowl. Leave for about 10-15 minutes until the breadcrumbs has softened and absorbed the liquid.
Add in the meats, lemon, onion, garlic, parsley, nutmeg, cloves, salt and pepper. Mix well.
- Form into 1-inch sized balls, roll in the flour (if using), and pan fry in batches in a pot with hot olive oil. Brown the meatballs on all sides.
- When you've fried them all, you may have to clean/wash the pot if you used flour for dusting most of which would most likely to be a little burned by now and you don't really want a burnt taste in your sauce. Otherwise, just carry on - adding more oil if needed.
- *For the sauce: briefly saute the onion and garlic in the same pot where you fried the meatballs. Add the rest of the ingredients including the fried meatballs.
- Bring to boil then lower heat and simmer for 1 hour, stirring from time to time to prevent scorching at the bottom. The sauce should be quite liquid so add more water a little at a time if needed. Serve warm.
I know, I know, this post has been way overdue. I should have immediately blogged about the wonderful Saturday back in October that I spent with a fellow food blogger Sha and her sister Tara. We walked across the Golden Jubilee footbridge from the Embankment side to cross the river Thames and then leisurely strolled along the Southbank culminating in a cafe in the National Theatre where we had pastries and hot cocoa. The sisters were such a good company to be with, in fact we were yakking so much we didn't realise it was already late afternoon and we have to go and fetch my daughter from Euston.
Later in the evening we had dinner at Gerrard's Corner restaurant in Chinatown. Well the food was okayish, nothing really outstanding so I guess I won't be back there for quite sometime.
Sha was so generous to have lugged gifts for me from her French sojourn. Here they are in the picture below from left: Herbes de Provence, Chestnut cream/puree (bottom), olive tapenade (top), anchovies, and organic sweets. Thank you very much Sha and Tara for the wonderful company and these delicious treats!
My kids at first ignored the sweets when I gave it to them probably because the colours were not as vivid as the more commercial-chemical laden ones. But once they tasted it, it was gone in a minute! Hehehe. That's why I keep telling them, don't judge a food by its appearance, taste it first that's what I say.

I thought of doing something with the chestnut cream or the anchovies. Since we were hankering for pasta last night, I thought of doing something quick and flavourful - Puttanesca sauce. I'm sure you've heard of the stories that the name of this sauce has some disreputable origin. Whatever it came from, this certainly is one very tasty sauce. My husband would definitely agree with that. Almost any type of pasta can be used here. For my picture below I used wholewheat spaghetti thus the slightly brownish tint.
 Pasta Puttanesca
4 pieces anchovy fillets - chopped
1 tsp minced garlic
1 fresh red chilli - deseeded and finely chopped (optional)
1 x 400 g can chopped tomatoes
1 Tbsp capers
1/2 cup sliced pitted olives
1/4 cup chopped fresh flat-leaf parsley
1 Tbsp chopped fresh basil
1 1/2 Tbsp olive oil
salt and pepper
250 g spaghetti
- Cook spaghetti according to the package instructions until al dente. Drain and set aside.
- Heat the oil in a pot or large pan.
- Saute garlic, anchovies, and chilli in the hot oil for about 1 minute.
- Add in the tomatoes and bring to boil. Lower heat and simmer for 2 minutes.
- Stir in olives, parsley, basil, capers, salt and pepper.
- Simmer for a further 4-5 minutes.
- Add the pasta in the pot and mix well with the sauce. If it's too dry drizzle with a little more olive oil.
- Serve immediately.
*Note: It would be better if you could time the cooking of the spaghetti so that it will finish just a few minutes before the sauce so that it is piping hot when you add it in the sauce.
 I haven't been blogging in the same frequency as I normally did. The past 2-3 weeks I've down with flus, dizziness, and myriad infections plus the triple dose of birthday parties that kept everyone (especially me) very busy with the preparations. So this cake which I should have blogged last week got entangled with all the palaver.
Anyhow, Yorkshire Parkin (or simply Parkin) is traditionally served on Guy Fawkes day. That's the day that everyone lights up fireworks and drink copious amount of beer. ;) Well actually the guy named Guy tried to blow up the Parliament (with the King of England and the rest of the MPs) about 400 hundred years ago. Unfortunately, he and his cohorts were caught out and ever since then the whole country celebrates his capture with fireworks. Sounds to me like an excuse to have a party!
This is a no sweat cake (adapted from BBC Good Food's 101 Cakes & Bakes), mix 'em up, pour on a cake pan, bang it in the oven and out comes this dark molassesy ginger cake. It is best to wrap it up tightly and stored (maybe in another bread tin can) to mature for at least 3 days to let the flavour develop and keep it moist.
Yorkshire Parkin
250 g [2 cups] plain flour
100 g [1 heaping cup] medium oatmeal
2 tsp ground ginger
2 tsp bicarbonate of soda (baking soda)
225 g butter
85 g [1/2 cup packed] light muscovado sugar
100 g [5 Tbsp] black treacle or molasses
175 g [1/4 cup + 2 Tbsp] golden syrup or corn syrup
1 egg
3 Tbsp milk
- Butter and line a 23cm (9-inch) square baking pan with greaseproof paper.
- Preheat oven to 325°F/160°C/fan 140°C.
- In a bowl, mix and combine well the flour, oatmeal, ginger, and bicarbonate of soda. Set aside.
- In another small bowl, beat the egg and add in the milk. Set aside.
- Heat the butter, syrup, treacle, and sugar in a saucepan over gentle heat until butter has melted and the sugar dissolved.
- Add in the flour mixture into the saucepan.
- Then stir in the egg mixture, combine well.
- Pour into the prepared pan and bake for 50-60 minutes until the cake feels firm has a crusty top.
- Leave to cool then turn out from the pan and remove the greaseproof paper.
- Wrap the cake in clean greaseproof paper then aluminum foil.
- Store for at least 3 days, this will allow it to become softer and more moist.
 I spied some miso in our local Chinese grocery last week and decided to make this dish which we haven't had for a long time. I don't know how far back this Sinigang sa Miso goes in terms of cooking history but I wouldn't be surprised if it was created only around World War II - with miso being from the Japanese. Though I'm not sure if the Chinese use miso as well, if yes, then the origin of this would go much further back.
We often have this whenever the banks of Laguna de Bay overflow (we lived near when we were in the Phils.) which makes the bangus (milkfish) escape from the numerous fishpens in the lake. This is usually right after a typhoon. It's just one of the several dishes to make the most out of the cheap bangus flooding the market.
The miso lends some salty fermented taste and aroma which blends well with the souring agent and the vegetables of which it's recommended to have white radish and mustard leaves if not use any leafy veggies like kangkong (tung choi) or even spinach.
Sinigang sa Miso
500 - 700 g fish steaks (sea bass, salmon, etc.)
1 Tbsp oil
1 tsp minced garlic
1 medium onion - sliced
3 - 4 medium tomatoes - sliced
3 Tbsp miso paste
1 tsp salt
4 - 5 cups rice water* or water
souring agent (tamarind, lemon and lime, etc.)
1 white radish - peeled and sliced
1 green or red long chili (siling haba) - washed and pointed end cut
bunch of leafy vegetables (kangkong, mustard leaves, spinach, etc.) - washed
- In a medium sized pot, heat oil and gently saute garlic then add onions and cook until onions are translucent.
- Add in tomatoes, cook for 3 minutes or until soft. Mash the tomatoes a little bit.
- Stir in the miso and salt, saute for a minute.
- Pour in the rice water and bring to boil.
- Add in the fish, white radish and chili. Cook on medium heat for 5 minutes.
- Add the leafy vegetables and souring agent. Simmer for 2 minutes.
- Taste soup and adjust seasonings if need be.
*Note: Rice water is the water used in washing rice for plain cooked rice.
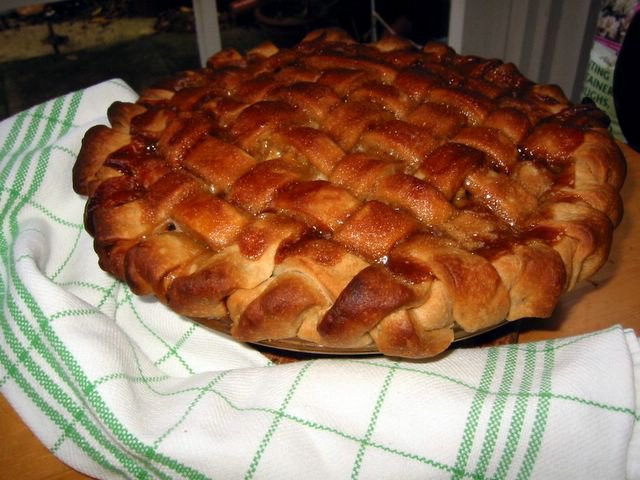
 In our previous house all I had for an oven is a small table top one because the built-in convection oven was not working properly. Since the working one is small, all I could hope to bake in it is based on the size of the pan I could squeeze in. So tube pans and baking sheets are out; brownies, cookies, and mercifully pies are in, since I was able to find a pie pan small enough to fit in. At that time, I was still 'actively' lurking (what an oxymoron) in a Usenet discussion group - rec.food.cooking (RFC) and drooled over the recipes and food the members so lusciously describe. There was this one guy who touted his apple pie recipe as the 'best ever'. Hmmm, should I believe him? Only one way to find out - bake it. And guess what, he wasn't lying! It was and still is my favourite apple pie of all. Very caramelly and with a salty-sweet flavour (courtesy of the syrup).
Over the years of moving house and not having much time to bake, I lost the recipe and I was recently surfing the net trying to find the exact recipe. Good thing I managed to find the exact same one in the excellent website of the Dinner Co-op group. They credit their friend Fritz Knabe and the Southern Sideboards cookbook for the recipe.
You may use any of your favourite two-crust recipe for this. I think the only tricky thing is the latticed top crust which might be a challenge for some. But it's not really that hard to do. More like doing a basket weave which I'm sure most of you have done in your home economics class in school. For a pictorial guide on how to do it click here, go to the section for woven lattice. If lattice is not your thing, you can always put a normal rolled crust just make sure to put holes on it (decorative holes would be nice). I toned down the sugar a lot in the filling (maybe because I use Golden Delicious which is not so tart), so it's up to you if you want to increase it a bit by adding sugar. While the topping syrup is likewise reduced by a third because usually I end up with quite a bit leftover. Enjoy!


The Best Ever Apple Pie
*Crust
2 1/2 cups flour
3/4 cup cold unsalted butter
1/2 tsp salt
4-5 Tbsp cold water
*Filling
6 Golden Delicious or Granny Smith apples - peeled, cored, and chopped
1 Tbsp cornstarch
1/4 tsp fine salt
3 Tbsp butter melted
1 tsp ground cinnamon
1/3 cup golden syrup or corn syrup
*Topping
1/3 cup firmly packed brown sugar
2 Tbsp corn syrup
1 1/2 Tbsp flour
1 1/2 Tbsp softened butter
- For the crust:
- Combine the flour and salt in a bowl.
- Cut the cold butter into the dry ingredients with a pastry cutter or two butter knives until the mixture is crumbly.
- Sprinkle enough water and knead it just enough to hold it together and form a dough ball. *Do not* over work/knead it or it will become quite stiff.
- Wrap in plastic and chill in the fridge for at least 30 minutes.
- For the filling:
- Mix the cornstarch, salt, butter, cinnamon, and syrup until well combined.
- Toss the chopped apples in this mixture.
- For the topping:
- Combine all ingredients in a bowl until well combined. Set aside.
- To assemble:
- Preheat oven to 425°F/220°C/fan 200°C.
- Take the dough from the fridge and divide into two.
- On a clean, floured surface or between greaseproof paper and cling film, roll flat half of the dough evenly with a rolling pin into a circle shape with a diameter of about 11 inches.
- Turn out dough on a 9-inch pie plate. Trim edge until you have about 1 inch overhanging all around.
- Pour the apple filling on the pastry-lined pie plate.
- Again on a clean floured surface, roll out flat the remaining half of the dough and cut into long strips about 3/4 - 1 inch wide. Weave these strips on top of the apple filling into a lattice pattern. Trim edge until you have about 1-inch overhanging all around (same as the bottom crust).
- Tuck the overhang under and flute the sides decoratively with a fork or with fingers.
- Bake in oven for 10-15 minutes.
- Lower oven temperature to 350°F/180°C/fan 160°C and bake for 30-35 minutes.
- Open the oven and spread the topping on top of the lattice crust.
- Bake for a further 10 minutes or until the top becomes golden brown.