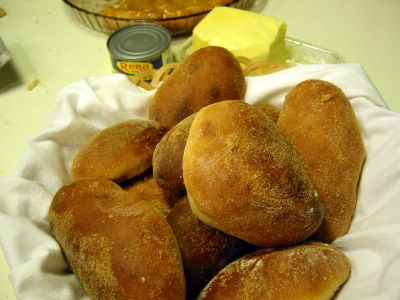
 Gising na! Wake up! Breakfast time ... that's the current theme of the 7th Lasang Pinoy ably hosted by the early-morning-food blogger Joey of 80 Breakfasts.
The traditional breakfast of Filipinos has been rice or garlic fried rice with either fried/grilled fish, tocino, or longganisa. But in our family, a lot of our mornings are filled with that ubiquitous crusty roll endemic to Filipinos called Pan de Sal (also spelled without the spaces - pandesal) which means literally bread with salt. I could imagine the original pan de sal must have been more on the salty side rather than the sweet one that is common now which is how I have always known what a pandesal should taste. There was a long time in my youth that I could not imagine a morning without a warm pandesal to satiate my hunger. It's very versatile you see, you can spread a variety of things between its fluffy insides such as butter, liver spread (pate), jams, preserves, matamis na bao, peanut butter, pancit, ice cream - you name it. Or you simply dunk it in coffee or tea.
Sometimes even in the evenings when someone in the household comes home late, passes by a bakery then buys fresh-off-the-oven pandesal. You can bet that anyone among us kids will awaken with the fragrant waft of the hot pandesal. Down the stairs we came to partake in the midnight snack. I love it smeared with liver spread. Yum!
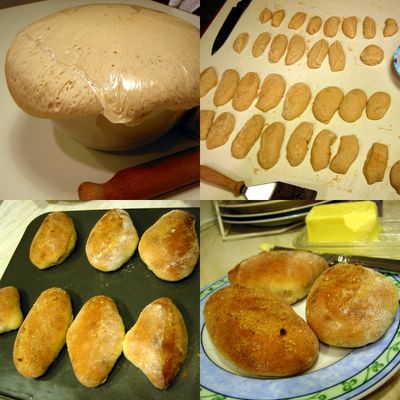
This is my very first time to bake pandesal and I had to call my aunt in Cavite to get her recipe which she got from her Home Economics subject when she was studying in Teacher's College about 35 years ago. Yeah that long ago. Now I don't know if I misheard the measurement of the liquids because the dough turned out very sticky and really hard to handle. I don't know if it's supposed to be like this. I think I'll be calling my aunt again in the weekend. Despite the intense stickiness, I managed to knead it (with a lot of help from sprinkled flour) and let it rise. She said it will double in bulk after 2 hours, I think mine tripled that's one reason why I suspect there's too much yeast. Maybe the yeast that I use here is more potent/concentrated. I'll certainly have to play around with the proportions in this recipe later. It was also hard for me to cut it to uniform-sized individual rolls since it's very soft. Thank goodness it came out alright from the oven - fragrant and crusty though somewhat moist inside. I don't know if it's supposed to be like this but it certainly was good enough for my family. :)
 Pan de Sal
8 cups plain flour
1/4 tsp salt
1 cup sugar
1/2 cup cooking oil
2 1/2 cups cold water
1/2 cup lukewarm water
1 Tbsp yeast
- In a small bowl, combine the lukewarm water, 1 tsp of the sugar and yeast. Let stand for about 15 minutes in a warm area. By this time it will be foamy; whisk well.
- In a big bowl, mix cold water with oil, salt and the rest of the sugar. Stir until sugar and salt are dissolved.
- Add the yeast mixture and 1 cup of the flour. Stir to combine.
- Add the rest of the flour a little at a time. Mix with a wooden spoon until dough pulls away from the sides of the bowl.
- Knead the dough on a floured surface until smooth. If needed sprinkle some more flour to keep the dough from sticking too much.
- Put in a greased bowl and turn to coat the dough all over with oil.
- Cover and let rise in warm place for 2 hours.
- Punch dough and turn out on a floured surface.
- Divide into 4 and roll each into logs. Cut the logs into individual rolls.
- Sprinkle breadcrumbs on the rolls and arrange in greased baking sheets.
- Cover with a damp cloth and let rise for 30 minutes.
- Bake in a preheated oven of 200°C/fan 180°C/400°F for 13-15 minutes.
- Remove from baking sheet. Serve hot or cold.
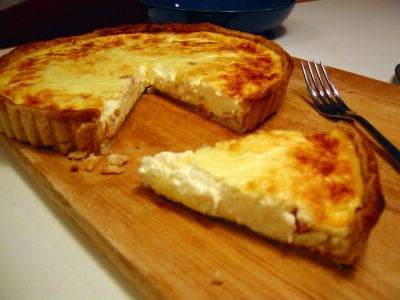 The 23rd monthly edition (hosted by Cucina Testa Rossa) of the premier food blogging event Is My Blog Burning? requires us to create something staunchly French. I was planning on taking on the formidable task of cooking bouillabaisse or cassoulet but the sheer scale of the mammoth undertaking made me chicken out. Just the number of ingredients plus the length of time it will take to cook it completely intimidated me. I could easily have opted for the more easy or shorter versions of it but for me that would be cheating. So in came this idea of doing my son's request of a Quiche Lorraine.
A quiche is also known as a flan or tart. This version, as you might have guessed, originated in a north-eastern region of France called Lorraine. A once independent and properous region, it was only assimilated to what we know now as France as late as 300 hundred years ago. Due to its position by the German border, it saw its owners changing hands several times during World War I and II. More of its history can be seen here.
The first time I made this is via a BBC Good Food magazines 'ultimate' recipe. In there, it instructed to add Gruyere cheese. I did, but my son would not even touch it. He objected to the smell of the cheese. So I researched on what constitute a traditional quiche Lorraine. According to Elizabeth David in her book, French Provincial Cooking, the Quiche Lorraine that the natives of that region regard as such is simply a savoury custard pie with eggs, cream, smoked bacon and *no* cheese. That was a revelation to me, since everywhere I went whether here in UK or in Paris, these tarts almost always have some cheese in them. But I have to agree with Ms. David because when we passed by the area of Nancy in Lorraine last year, all the Quiche Lorraines we ate had no smidgen of cheese.
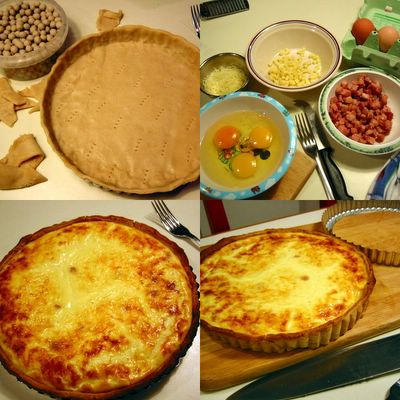
That settled it, I have to do this first without the cheese then with it (just to make the comparison). I have to admit I liked it regardless if it has cheese or not. Surprisingly, my son favoured the one with cheese. Could it be because I used the less smelly mature cheddar? The dominant flavour of the smoked bacon in the custard was simply divine whether served hot or cold. Although I have to remember next time to make the crust thicker. I like it thick as a foil to the richness of the filling. This is best served with a big salad and a chilled Sauvignon Blanc. (sorry no pictures of the wine) Recipe was adapted from the September 2005 issue of the BBC Good Food Magazine.
 Quiche Lorraine
*Pastry
175 g [1 1/3 cups] plain flour
100 g chilled butter
1 egg yolk
3-4 Tbsp cold water
*Filling:
400 ml [1 2/3 cups] double cream (or half creme fraiche, half double cream)
50 g Gruyere or mature cheddar (optional)
150 g smoked/unsmoked bacon lardons or streaky bacon slices
3 eggs - beaten
pinch ground nutmeg
- Take 2/3 of the cheese and cut it into small dice. Grate the remaining 1/3 of the cheese.
- Dice the bacon finely.
- For the pastry:
- Put all the ingredients in a food processor and process until it forms into a ball.
- Or if you don't have a food processor: cut the butter into the flour in a bowl until it has the consistency of coarse crumbs.
- Add in the egg yolks and toss with fork.
- Sprinkle the water little by little until you can gather the mixture into a ball.
- Press and knead between your hands until it just about holds together.
- Roll out with a rolling pin into a circle 11 inches (28 cm) wide.
- Carefully put on a fluted tart pan.
- Trim the pastry edges about 1/4 inch higher than the pan edge.
- Press the pastry into the flutes and prick the base with a fork.
- Chill for 10 minutes in the fridge.
- Preheat oven to 200°C/fan 180°C/400°F.
- Bake blind: put a piece of aluminum foil (shiny side down) on the pastry-lined pan. Fill it up with dry or ceramic beans and place on a baking sheet before putting in the oven. Bake for 15 minutes.
- Remove foil and beans. Bake for another 4-5 minutes.
- For the filling:
- Reduce oven temperature to 190°C/fan 170°C/375°F.
- Fry the bacon (without oil) in a small frying pan.
Remove any liquid that comes out and cook until bacon changes color. Drain on paper towels.
- Mix the double cream, eggs, and nutmeg in a container.
- Scatter the fried bacon and diced cheese on the bottom of the pastry case.
- Pull out half of the oven shelf and place the pastry case/tart pan on the baking sheet.
- Pour the double cream mixture in the pastry case. Scatter the grated cheese on top.
- Carefully push the oven shelf back in. Bake for 25-30 minutes or until golden brown.
- Remove from oven and cool for about 5 minutes. Serve hot or cold.
Tagged with:
IMBB23 +
French
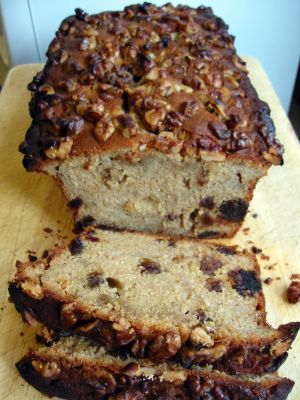 This is one moist and scrumptious cake perfect for teas. I was skeptical at first since I've done a lot of these banana cakes that usually turn out a bit hard and more bread-like rather than cakey. But this one was a revelation so a definite keeper. I think the dates provided the needed moistness while the muscovado sugar imparted a delicious treacly taste in its personality. You can see in the picture that the edges of the top was definitely burned. Hehehe. I was too smug in my baking abilities and assumed that the baking temperature is the usual 180C/350F. Forty minutes after putting in the pan in the oven, I sneaked a peek in the recipe book and it said there - 160°C *not* 180°C. Yikes! That's a 20-degree difference! I lowered the temperature immediately good thing it did not singed to ashes the rest of it. :)
The nifty BBC books cookbook 101 Cakes & Bakes, provided the recipe I adapted.
Banana Date Cake
175 g butter - softened
100 g [1/2 cup + 1 Tbsp firmly packed] light muscovado sugar
3 Tbsp honey
2 eggs - beaten
225 g [scant 2 cups] self-raising flour
1/2 tsp ground cinnamon
2 medium, ripe bananas - mashed (about 1 cup)
100 g stoned dates - chopped
50 g walnuts - chopped
- Grease and line the bottom and long side of a 1 kg/2 lb loaf pan. Preheat oven to 160°C/fan 140°C/325°F.
- In a small bowl, mix the flour and cinnamon until well combined. Set aside.
- In a big bowl, beat the butter with the muscovado sugar.
- Add in 2 Tbsp of the honey and the eggs. Beat and mix well.
- Add the flour mixture and mix with a wooden spoon.
- Tip in the mashed banana and dates, mix until well blended.
- Pour into the prepared loaf pan.
- Scatter the chopped walnuts evenly on top.
- Bake for about 1 hour. Press the top lightly, it should be firm. If not, bake for another 10 minutes.
- Remove from oven and cool in the pan for 10 minutes.
- Lift out of the pan and drizzle the remaining 1 Tbsp honey on top. Cool completely.
For the longest time, I was trying to change my blog template and finally I found the time to do it. Originally I scouted a lot among the free templates floating around in the web. Then decided on getting this from Caz. Thanks Caz!
But I did have to change *a lot* in the html and css codes to tailor it to my needs and style. Now the problem is changing almost all of my posts because the recipe font is too big. Never mind I'll do it one step at a time. For now, I shall enjoy this one until that is, my fingers get itchy and I'll change it again. :)
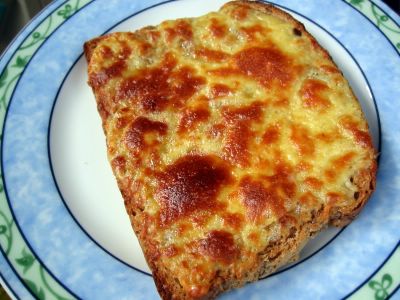 First time I heard the name, I thought it was stewed rabbit or maybe lamb. My son (J1) thought it was frogs. :) We had no idea that it will be something very tasty and delicious and very easy to make. That's one thing I like about Brits they affix witty, oftentimes funny, names to their food. This my friends, is essentially grilled cheese on toast, as simple as that. But made several degrees more delicious with the small addition of flavourings. Sharp tasting cheddar would be best so the extra mature ones would be great and in the US, the Kraft Crackle Barrel brand comes to mind. The Canadian extra mature cheddar would be excellent as well. So far, this is the best version I've tried which is adapted from Brian Turner's Favourite British Recipes.
J1 was very wary when he saw me making it. Just when I was adding in the English mustard he declared he's not going anywhere near it. Fine I thought. Come early morning he saw me grilling these babies. He asked if the ones in the oven are plain cheese and not the welsh rarebits. I said yes (I lied). So down he scoffed one. All I heard were - hmmm ... mmm ... and something along the lines of "it's delicious". That's when I broke the news that it was actually Welsh Rarebit. He was grinning from ear to ear. See, mums have to do a lot of underhanded tactics to make their kids eat something different and I'm glad my lie did not go to waste. LOL!
Welsh Rarebit
250 g mature cheddar - grated (about 2 cups)
1/4 cup double cream (heavy cream)
1 Tbsp beer or ale or water
1/2 tsp Worcestershire sauce
1 tsp English mustard or Dijon mustard
2 egg yolks
thick slices of wholemeal bread (or any type of bread)
- Heat the double cream until gently boiling.
- Add the beer and bring back to boil.
- Turn off heat; add the Worcestershire sauce, mustard, and grated cheese. Blend well.
- Add the egg yolks and stir well until the cheese has slightly melted and mixture is soft and liquidy. You may have to return the saucepan to the cooker at very low heat.
- Put in a container and cool. (It is best to use this the next day to let the flavours develop).
- Arrange the bread slices under the grill to toast one side. Remove.
- Spread a generous amount of the cheese mixture on the *untoasted* side of the bread.
- Put back under the grill until golden and bubbling. Serve warm.
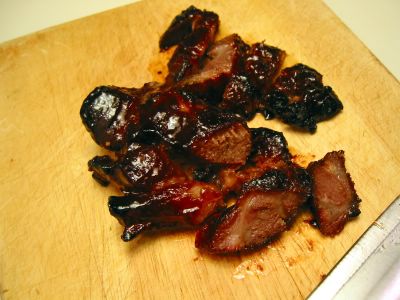 Sorry the picture isn't so pretty. Me and my husband were already quite famished when I took out of the oven. There was no time to arrange and make it pretty coz we were ready to devour it! I have several recipes of Char Siu or Cha Siu - known in English as Barbecued Pork. I intend to try them all but first I did Renee's (of the now defunct Shiokadelicious blog) recipe. Shame her formerly very popular and award-winning food blog is not online anymore. She probably is busy with some other things. Thanks very much Renee for sharing the recipe!
This is the reddish lightly charred roasted pieces of boneless pork meat hanging off a hook that you see in lots of Chinese restaurants. Very nice teamed with hot steamed rice poured with some soy sauce based sauce. Used in so many other Chinese dishes such as noodle soups, stir fried noodles, char siu pao (siopao), etc. It's quite universal and basic in Chinese cuisine or at least in the Cantonese style of cooking.
For this, I followed Renee's suggestion of using maltose. Which a type of sugar that is formed from malt usually from the production of beer. The one I got from the Chinese grocery is a very thick liquid. By the time I used it, it got cold a bit and was so very thick hence, very hard to take out of its plastic tub. I had to put it out for a time somewhere warm to soften it. Additionally, it's only mildly sweet (I tasted of course). So the resulting char siu was more on the salty side. Next time I think I'll replace some or all of it with honey just to see how the flavour will develop. But the one thing good about maltose is that it gives the char siu this nice glossy sheen that makes it look so attractive. No wonder restaurant chefs use them a lot. So maybe next time I'll keep the maltose for glazing and just increase the sugar or use honey in the marinade? Also, I did not use any red food colouring. I don't think it needs one since the Hoisin sauce already gives out the rouge it needs. Besides, I'm not too fond of artificial colouring what with all the chemicals you can find in there. I'll have to experiment on that soy sauce-based thin sauce that they pour over this on rice. My hunch is it's made from the drippings of the barbecued pork itself. If any of you have a recipe for that sauce please give me a tip. Thanks. :)
Char Siu
(Barbecued Pork)
1 kg pork (fillet, liempo, shoulder steaks, etc.)
5 Tbsp light soy sauce
3 Tbsp dark soy sauce
5 Tbsp maltose (or honey or combination of honey & maltose)
1/4 cup granulated sugar
1/4 cup rice wine (or sherry)
1/4 cup Hoisin sauce
3 pcs 1/4-inch thick slices of ginger - smashed
4 garlic cloves - kept whole and smashed
red food colour (optional)
*Glaze
2-3 Tbsp maltose (or honey) - warmed
- Mix all ingredients (except pork) in a saucepan. Heat for about 1 minute just enough to dissolve the sugar. Remove from heat and cool.
- Marinate pork in this mixture for at least overnight.
- Preheat oven to 210°C/fan 190°C/410°F.
- Remove pork from the marinade and arrange on a rack set on a roasting pan with about 1/2 inch of hot water in the pan. (This is to keep the meat moist during roasting). Bake for 15 minutes.
- Lower heat to 180°C/fan 160°C/350°F, baste the meat with its marinade and turn them over. Cook for a further 15 minutes.
- Baste again with marinade and cook for another 10 minutes. Check if meat is done.
- Remove from oven, brush with the warmed maltose (glaze) and grill for about 2-4 minutes until it's nicely browned or charred - whichever degree of finish you like.
- Serve hot or cold sliced on hot steamed rice, noodles, etc.
 I found another beancurd recipe to use up a box that was soon to expire. This one has a very tasty and slightly spicy batter. And I suspect this is very similar to the fried beancurd we used to have in a Chinese restaurant in the basement of the old Makati Cinema Square in Pasong Tamo Ave. down in Makati. That one had a very nice sauce which complements it well. I guess I'll have to concoct that next to complete the similarity. The book The Food of China yielded this nice dish.
Fried Savoury Beancurds
500 g beancurds
100 g minced pork (optional)
1 cup plain flour
1 egg - beaten
1/2 tsp salt
1/2 tsp sugar
2 tsp chicken stock powder
1 Tbsp chilli sauce
water to mix
oil for deep frying
freshly ground black pepper
shredded green onions or chopped herbs (for garnish)
- Combine flour, egg, salt, sugar, chicken powder, chilli sauce, pork and enough water to make a batter with the consistency of double (heavy) cream.
- Cut the beancurd into pieces of 1/2 inch thick, about 2 inches long, and 1 inch wide.
- Heat oil in a wok or saucepan until slightly smoking.
- Dip the beancurds in the batter then slip them one by one and in batches in the oil. Deep fry for about 3-4 minutes or until golden brown.
- Garnish with black pepper and herbs.
Now I need these tips badly. I am supposed to be on a diet but as often I find myself slipping into snack attacks - of the most yummy and weight-busting kind! Help! Mel of Hecticium tagged me for this almost a month ago. It's always at the back of my mind ever since but I couldn't find the time to sit down and type away things I found useful in my perpetual quest for the perfect body weight. Here they are and I hope you find them benficial to you:
- Drink lots of water. Even when not on a diet, we don't often take the recommended amount of water everyday. We need it much more when we're demanding a change in our body during diets. The recommended daily amount is between 6-8 glasses. Believe me when we drink it that much and that often you'll feel so much refreshed and our skin will look nicer afterall it washes away toxins from our body and gives us a very necessary ingredient to our bodily functions. Drink up!
- Exercise regularly. I should tell this to myself. *sigh* It's becoming a habit now of me forgetting to exercise to help in the shedding of the pounds. As you well know, just dieting will not make your weight loss stick. With a regular regime of exercise, not only will your weight loss accelerate but it will most likely help keep it off. Besides exercise makes your body secrete endorphines which makes us happy bunnies.
- Right frame of mind. For me this is one of the most crucial thing before I set off to do something. I have to visualise it and create it in my mind first before physically acting on it. Otherwise the venture would be just half-hearted and many times won't work. So it's important for me to start a diet with a firm resolve and will power to carry it through.
Well I hope I can follow my own advise. ;) I actually don't know who to tag next so if you're interested please tag yourself. Now, I think I was tagged for another meme ... what was that one? Hmmm ... thimk think thimk.
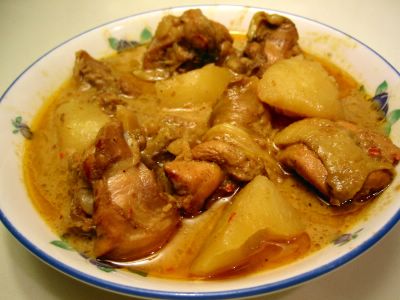 I can still smell the pungent rich aroma of this nice curry. Lots of spicy tang from the tanglad (lemon grass), belachan (shrimp paste), lots of ginger, and of course the curry powder. Then enriched with the addition of coconut milk. Yum! This is more of a Southeast Asian type of curry rather than the Indian type which is noticeable with the lemon grass and belachan.
I've been hankering for a nice hot curry probably prodded on by the cold weather permeating Southern England right now. Instead of buying or borrowing another cookbook, I rummaged through all of mine scattered throughout the house where I found this gem of a recipe from one of my oldest cookbooks that hails all the way from Hong Kong (circa 1991), Cecilia Au-Yeung's Chopsticks Recipes: Introduction. And I just love love love the resulting aroma in this fabulous keeper of a dish. The only thing I had a problem with was the ginger juice. I didn't have enough of the root crop to squeeze that much besides I thought it's too much work for moi. So I just julienned about 2-square inch of it for the marinade and removed them before adding in the chicken. Other than that, it would help if you have an electric chopper so you could just whiz all the spices and wouldn't have to pound away with a heavy mortar and pestle. So if you find yourself in an Oriental store one time, pick up a few of the more exotic ingredients (the rest are common in kitchens everywhere) then do try this one - I highly recommend it!
Chicken Curry
1 1/2 kg chicken - cut into serving pieces
2 onions - mashed or pureed
3 Tbsp curry powder
1 tsp turmeric
2 Tbsp ginger juice*
2 Tbsp cooking wine
2 slices ginger
1 lemon grass
5 Tbsp oil
3 garlic cloves
2-3 chillies - seeded and chopped
2 tsp belachan (shrimp paste)
500 g waxy potatoes - peeled and quartered
1/2 cup water
2 cups coconut milk
2 tsp sea salt
1 Tbsp sugar
1/2 tsp chicken powder
- Mix the ginger juice, 1 Tbsp of the curry powder, and wine with the chicken. Marinate for at least 1 hour. Set aside.
- Remove outer skin of the lemon grass. Lightly mash then chop into smallish pieces.
- Using a mortar and pestle (or an electric blender/chopper) mash the lemon grass, garlic, ginger, belachan, and chillies into a smooth paste. Set aside.
- Combine 1 Tbsp of the oil with the turmeric powder and 2 Tbsp of the curry powder to make a thick paste.
- Heat a pan with 1 Tbsp oil and saute the pureed onions until aromatic.
- Add in the curry mixture and fry for about 30 seconds. Remove from heat.
- Mix in the lemon grass mixture and stir to combine well.
- In a medium sized pot, heat 3 Tbsp oil and saute the curry-lemon grass mixture over low heat until pungent.
- Stir in the chicken with the marinade and cook for about 2-3 minutes.
- Add in the water, salt, sugar and chicken powder. Simmer for 20 minutes.
- Tip in the potatoes and simmer for about 10 minutes or until potatoes are cooked.
- Stir in the coconut milk and bring to boil again.
- Remove from heat and dish up.
*Note: If you don't have the equipment nor the inclination to make ginger juice, peel and julienne a 2-inch square piece of ginger and use this instead.
 If you recall a month ago, I made leche flan several times. After that, I was like a woman possessed and obsessed with trying to use up all the resulting left-over egg whites. Thus all this flurry of recipes of meringue-based desserts that makes use of the egg whites so effectively. I think I should make another recipe category here - 'Egg Whites Repository' or something like that.
This cake was described by a friend as having a very delicate lovely flavour. What I like most about it is the contrast of the softness of the cake with the crunch of the almonds and chocolate chunks then topped with the sublime cloud of apricot-flavoured whipped cream. This is definitely a keeper. Adapted from my favourite 101 Cakes and Bakes of the BBC GoodFood Magazine.
Almond Apricot Torte
5 egg whites
200 g [1 cup] caster sugar
100 g [1 cup] ground almonds
50 g [1/2 cup] flaked almonds - toasted
50 g dark chocolate - chopped
*For the apricot cream:
300 g apricot compote or preserve
425 ml [scant 1 1/3 cup] double cream
*For the decoration:
3 Tbsp flaked almonds - toasted
25 g dark chocolate - shaved
icing sugar for dusting (confectioner's sugar)
- For the torte:
- Preheat oven to 180°C/fan 160°C/350°F/gas mark 4. Butter and line the base of a 25 cm (10-inch) springform pan.
- Beat the egg whites until stiff. Then gradually whisk in the caster sugar, a tablespoon at a time.
- Using a metal spoon, lightly fold in the ground almonds, toasted flaked almonds, and the chopped chocolates.
- Pour the mixture into the pan and bake for 40-45 minutes until crisp at the top and light golden.
- Remove from oven and allow to cool in the pan for about 5 minutes. Turn out and leave to cool on a wire rack.
- For the apricot cream:
- Beat the cream until soft peaks.
- Fold in the apricot compote gently to give you swirls of apricot. Spread this mixture over the torte.
- For the decoration:
- Scatter the shaved chocolate and toasted flaked almonds on top of the apricot cream.
- Dust lightly with icing sugar.


